Saturday 13 September 2014

Hindsight and all that

Early start at Yorkshire Triumphs this morning, Pete had offered me the use of the liFt and tranny jack as he knew that FRanK needed a clutch change for the RBRR. YT are running a mk1 2000 estate in the event this year, their first go.
So at just after 8 the bench was layed out ready for the fun to begin.


FRanK assumed the position, before he was elevated the battery was disconnected and the gearlever removed.


Exhaust, propshaft, wiring, starter motor and speedo cable were disconnected/removed and the tranny jack was positioned under the box to take the strain as the gearbox subframe was removed. back of the gearbox was lowered and the rest of the bellhousing to backplate bolts and the clutch slave cylinder were removed.
With some assistance from Pete (these o/d boxes are a little heavy!) the gearbox was pulled back to disegage the input shaft from the clutch and the box was out on the ground.


Pete then set too replacing the UJs on the prop, a little play was detected a month or two ago and 2400miles in a few days may have been too much for them. Some of GKNs finest (from YT)  were used.


First impressions were that the fingers were a little worn but at least there wasn't a rampant leak from the crankshaft oil seal. The starter motor is tyraped to the drag strut, saved disconnecting it.


Once the old clutch had been removed and sat next to the new one, the differences were obvious. Although not quite at the rivets, the wear was substantial and worse towards the outside, the cover also showed signs of getting hot/slipping. The flywheel was fine, not scored or marked. Result!


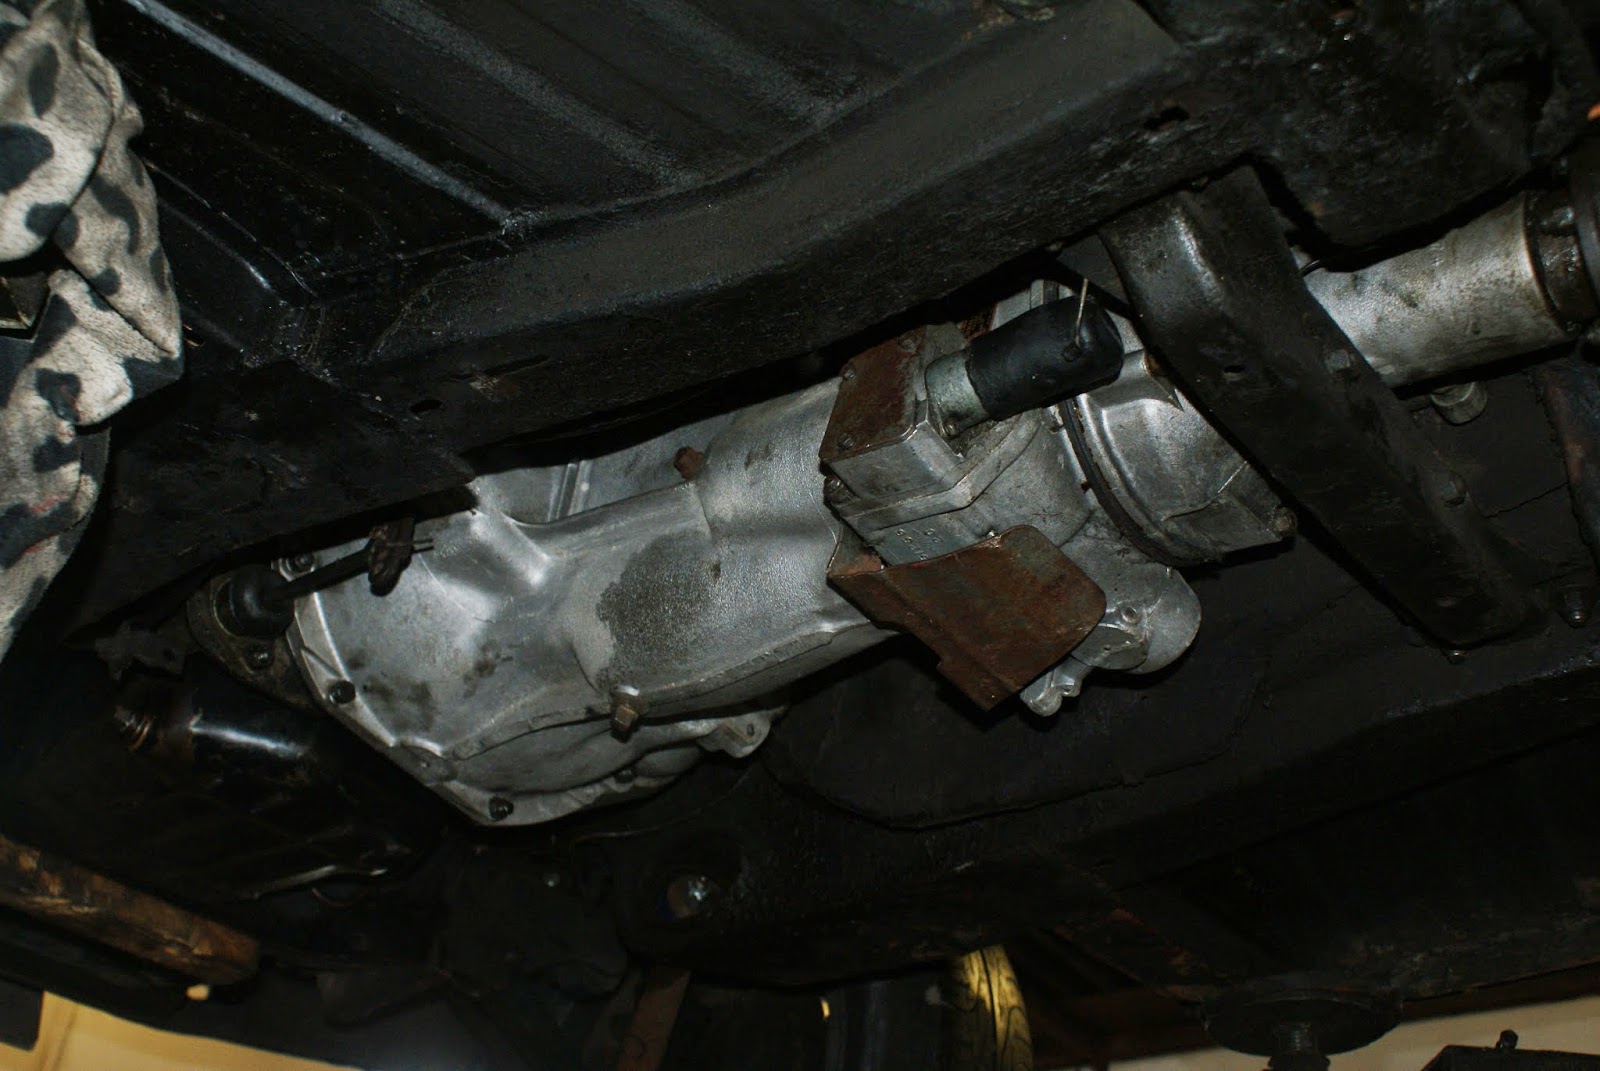
The picture below (pre alignment) shows the new clutch in position. The relase bearing was changed for a new RHP one, the old Japanese one was like a percussion instrument when you shook it.

  
It all went back in the reverse order, new downpipe gasket etc, etc. Then I remembered that the replacement box was dry. Should have filled it with oil before hoisting it back into position. 
Do you think I could get the filler plug out. By now it was early afternoon and I was alone at YT. So back tomorrow morning with Pete, he will weld a nut to the rounded bung for me, the heat will have assisted the removal process too hopefully. So just the oil to do, refit the gearlever and connect the battery. I knew filling the box on the bench was the easiest option...........


Looks nice though and Pete lent me his Gitfire for the trip home, a sort of coutesy car. Goes very well, but I couldn't imagine doing the RBRR in one.

Sunday 6 July 2014

Reassembly and has it worked?


During this engine work I have been asking those more knowledgeable than me for advice. 
More than a couple of  pearls of wisdom came from Dave Harvey, so thanks Dave.
Reassembly was a repeat of strip down but with new gaskets etc. The newly rung pistons were refitted to the freshly honed bores after cleaning the crank journals with some 1600 grit wet and dry and WD40. Crank endfloat was set using feeler gauges (I have no dial gauge) and some new thrust washers. The sump which was a little lighter after removing a half inch of sludge from the bottom, was refitted. The head followed. 
The front suspension was pretty much stripped to remove the sump so I changed the original drag strut bushes for some superflex ones. I also had an NOS steering column to fit replacing the original with it's knackered bearings. The bulkhead bush had been poly'd by a PO.

Once reassembled, the sump was filled with some SAE30 monograde oil to aid 'break in' of the rings.
Fire up (after getting the oil pressure up) was fuss free. As advised by Dave I let the car start without coolant and run for half a minute. The idea is to allow the head gasket to seal via some heat without the chance of water seepage. In for some dinner then  added coolant once the engine had cooled. I retorqued the head now and checked valve clearances. 
Start again and time to test drive. A self imposed 3000 rpm rev limit proved easy to reach, the engine feels tight but strong and very willing. The steering was better too.
This left me with the choice of trying to get enough miles on the clock before leaving for the 2000 Register National at Bamburgh in just over a weeks time or changing the oil there.
Any excuse to use FRanK saw 400miles done and the oil being changed for some cheap non detergent 20/50 the night before we left. Oil consumption in that 400miles was not enough to show on the dipstick!
My Mum and Dad had arrived on the Saturday and followed us to the National. The photo below shows me, Dad's car Cecil and FRanK in the carpark of Scotch corner services. A traditional fuel stop for us on the RBRR.


FRanK's sunroof stayed open the whole way. 163miles of following us gave Dad and Mum plenty of chance to spot any blue smoke from the exhaust, none at all was seen. 
During the week of the National we travelled 640miles, again oil consumption measured via the dipstick was 'nil', fuel consumption was 28mpg and the way FRanK feels just gets better. So that's one more thing sorted ahead of October's RBRR. 
I decided that a little clean and polish was in order ahead of the National 'show' day on the Saturday, I've always liked a PI in Valencia.


Tuesday 17 June 2014

Honing and ringing the changes

After buying a 3 legged  glaze busting tool it was time with the help of my son Callum and some WD40 to 'hone' the bores ready to accept the new piston rings. This allows them to bed in correctly.
I had already been advised that it was difficult to over hone the bores, so a nice matt finish was what I was looking for. I think the slight recess near the top is normal on a higher mileage engine.....don't forget this isn't a full rebuild, just a way of reducing oil consumption, a refresh.


Half an hor later and a large can of WD40 and all 6 bores were done. I had covered the crank journals with blue paper roll before starting to catch the swarf . I was pleased with the results we achieved and put clean roll back in the bores once they had been liberally cleansed with more WD40.


So to my £10 purchase from Stafford last year. A set of standard size Cords rings, specifically designed for sprucing up an older engine.


Following the instructions soon had the cleaned pistons looking much better. Just a matter of  re-installing them back in the bores with the aid of the piston ring clamp and lots of fresh SAE30 engine oil, my chosen lubricant for the initial 500 mile breaking in period.  


Thursday 12 June 2014

Two heads are better than one?

After some rotary wire brush action the valve heads and combustion chambers looked much better.
The plan was just to stem the oil consumption so I wasn't going to dismantle the valves at all.


Pi heads have double valve springs with two piece valve spring caps, the idea I am reliably informed is that the two parts can rotate separate to each other. I spotted something strange on one of the exhaust valve caps. You can just about make out a hairline crack in the picture below.


So now I had a valve out and curiosity got the better of me. I found that there was a fair bit of wear in the guide............. The solution was sitting on my spare mk1 pi engine at the side of the garage. After stripping all the valves out of the spare head, I found 3 cracked exhaust valve caps but minimal guide wear. Round 2 of rotary wire brushing of a head was completed and I got ready to lap the valves in.
To my disbelief I then noticed something on the exhaust valve seat of number 1.


No!!!!!!!
At this point, reverting to the original but more worn head was the only solution so I consoled myself with removing the front subframe, steering rack and sump. All six pistons followed and at least the news was better this time. The crank had been ground to +10 thou. I had some NOS glacier bearings in just that size.


The big end shell bearings weren't in bad condition and the crank journals although a little marked would polish up fine.


More to follow.......

Saturday 7 June 2014

Curing FRanK's smoking habit.

With only 4 weeks until the 2000 Register National in Northumberland and the Club Triumph RBRR looming ever closer I decided that what was needed was an engine refresh for FRanK.
After conducting a dry compression test with 120-135psi readings across the cylinders and performing a wet test on the lowest which increased the reading to 180psi, I was fairly certain the rings were at fault.
So one evening I dropped the coolant out on the drive and pulled FranK back into the garage and over the pit.


A little spannering saw the battery out of the way and the injectors out, along with throttle bodies and exhaust manifold unbolted.


The complete water pump housing and under manifold pipe removed. Rocker gear and pushrods were safely stored in a numbered piece of card and the head securing nuts removed.
A little persuassion soon had the head lifted and on the bench.


The colour of the valve heads looked Ok but pretty dirty.


The good news continued when scraping off the top of a piston showed standard (original) size markings. The bores looked good to go with a little bit of work with a glaze buster and the Cords rings bought last year at Stafford could add the lease of life FRanK needed.


To be continued........

Friday 23 May 2014

NYTW at Runswick Bay

 
Third weekend in May is the North Yorkshire Triumph Weekend at Runswick Bay near Whitby.
I would imagine it's a similar thing to the Isle of White event for those in the North. We arrived Friday evening having driven the 100miles from home with the trailer on the back and the sunroof fully open. The weather was superb. Friday evening involved pitching our 'house' for the next two days, eating some dinner and enjoying a few drinks as we wound down from the previous weeks work. Very pleasant.
 

Saturday morning dawned with glorious sunshine. Excellent, this is the day for the roadrun out over the Moors with a suggested route and destination of the 'Red Lion' pub, the highest on the Moors I believe. Inevitably we went wrong a couple of times and the picture below was just one 'discussion' about where we should have turned.
 
 
The keen observer will have noticed the bright sunshine theme running through these pictures, it is very unusual for this weekend and event.
 

As can be seen in this picture above there are Fords to traverse and quite a few hills to climb along the way. Needless to say we managed the pub ok and FRanK performed faultlessly in the heat. The recent rear springs also showed their value four up on the undulating roads.
Saturday night at Runswick is party time in the big marquee with a live band and bar. They even let you take your own drink in if you want. Around ten o'clock we decided to head back to the tent and get the fire going and the drinks flowing.
 
Sunday is a relaxed car show and shine with prizes awarded to cars from the public's vote rather than 'judges'. Not familiar with what these lads are doing to the poor TR6, I believe they called it polishing! Must be a TR pastime.


This stunning little 12/50 Herald got my vote in it's class, a really nice car.
 
 
A friend of Amanda and I called Alistair has just had his mk2 GT6 painted after some new panels were fitted, he also changed the colour (to Amanda's dismay) from Sienna Brown to Lichfield Green.
I think it looks well in the colour which was never offered on this model of Triumph.
The general public judging must have thought so too as it won 'best GT6/Spitfire' and was second in car of the show.
 
 
For the 'mechanical admirers' out there, here is an under bonnet shot showing the car's 3 hungry Webbers.


And lastly the 'proud father' Al and his two shields for the day. Well done mate, told you the car would look good in Lichfield.


Thursday 22 May 2014

RBRR is getting closer!

As the title suggests, time waits for no man but a leaking diff will ruin itself in the end.
With this in mind and the Runswick weekend only 5 days away I decided that the incontinent nose oil seal had to go. The diff was looking pretty rough and the oil stains on the garage floor and pit boarding are annoying.
 

With the use of a trolley jack (and mole grips on some very overused nylocs!) the diff was out and on a dolly to move around.


Ihad anticipated that the original mounting bushes would be tired and got some superflex ones in stock for this job.
After much cleaning and painting the diff was at least ready for it's new leather lipped seal. Having been soaked in EP90 for 72hrs it was hopefully swelled enough to do the job.

 
I never throw away old bearings as they come in handy one day. Can't remember what this was from but its the perfect size to install the seal.
 
 
The diff was then installed back under the car with it's refurbished quill shaft housing, new bushes and new Nylocs. It looks much better in real life, the camera phone isn't like a DSLR in low light conditions (sorry).
 
 
The car was then put back on the ground, refilled with fresh oil and taken to Runswick a couple of days later.
270 leak free miles were travelled and along with  the new 575lb rear springs which were popped in one afternoon whilst I made a cup of tea (they are that easy really) FRanK performed really well and the rear springs gave an improved and more controlled ride. Just why I bought them really.
 
One more thing crossed off the 'to do' list.