Saturday, 30 April 2011

Sitting comfortably?

I won some Rover 620ti seats on ebay a few months back.I have been makng up some adapters for these from 50mm angle iron to mount them on a spare set of big saloon runners,after aborting the idea of using the Rover runners.You can see the brackets in the photos,the seats are mounted in for Monday's trip to York raceway for a bit of drag racing,they will be taken back out again,filed and painted ready to go back in with plastic side trims for Thursday's MOT and the Wallingford (near Didcot,oxfordshire) car show we are attending next Sunday with our friends Mike and Ann Stevens.


 The idea of the seats is to use them in either car as we need to,for long distance use/RBRR and such like.They look good in place,they aren't as extreme as Recaros but will give more lateral support than the standard slippy vinyl seats in the pi especially.If we get on well with them,I may look out for another 620ti passenger seat,they are obviously going to be less worn than the driver's seat that I have. 


Friday, 22 April 2011

Complete struts

 The component parts of a big saloon strut are not like some I have done before.The top mounts are not just a single unit that you place over the top of a compressed spring and fix with a single nut.The thrust washers and centre bush/sleeve need to be put together in the correct order to work correctly.
 The coil springs need a lot of compressing from their free length,I used three clamps on each to give more confidence.I also found on assembly that the clamps need to be a full coil in at each end or they will foul on the spring pans as you release the tension-guess how i know?
I also know that you cannot tighten the top nut down properly without a 15/16 deep ring spanner,not the ring end of a combination spanner.
After trying Halfrauds,screwfix,toolstation etc.I found a proper tool merchants who not only sold AF spanners but BSW too.£11-53 later I had the correct spanner in the back of the car.
Later I tried to tighten the nut up,sure that the 'endfloat' was due to the nut being loose.I then became concerned that I may have assembled something incorrectly and proceeded to strip it all back down.The moral of this part of the story is to check that the sleeve in the centre of the topmount is the same length as the top mount and coated thrust washers,you can't tighten the 'endfloat' away!
My problem here was assembling parts from four strut top mounts into two.After the learning curve of the first strut the second was a 20min piece of cake
 Install on the pi won't take long,remembering to watch out for the shims on two of the four lower bolts.The car should be about ready for the MOT it's due early in May,just a check of the handbrake adjustment after the Stag drums have bedded in.

Wednesday, 20 April 2011

Diff and strut latest.

Firstly a photo of the freshly rebuilt differential for Amanda's estate, carrying it from Alan Chatterton's Audi to the pi boot at Crich was not an easy task. Not looking forward to lifting that in to place!
 It has to be said that if the outside looks of the diff are any reflection on what the insides look like,Mike Papworth has done a great job.Thanks also to Alan,not only for picking up the diff from Mike and bringing it to Crich,but also for taking Dad's old driveshafts back to Mike.
And so to this evening.My freshly painted strut tubes need building back up,the thread in one was a little challenged and although the insert retaining ring was picking up,it needed winding in with a tool.
 The inserts I got from E J Ward have pin drive retaining rings rather than a hexagon nut.This is wound in as far as needed to stop the insert moving up and down.Two washers were needed as packing pieces under the strut insert,don't forget to pinch the top in to stop the retaining ring coming undone.
 I knocked up a 'tool' for the retaining rings out of some flat bar and two 4mm bolts.A hole cutter removed the centre to allow the damper rod to pass through and the bolts were secured by tapping the holes and screwing them in.
Guessing the positions for the bolt holes gave me two rather than three pins lining up,but that was enough to wind them in whilst the strut was held in the vice.The bottom superflex spring insulators can be seen in place.Just the springs and strut tops to fit on along with gaitors and top spring insulators.Then on to the pi ready for it's MOT.

Thursday, 14 April 2011

'Cars on your drive always end up with their wheels off!'

That was what my neighbour said this morning when he popped home for a couple of bits from his garage.I guess he is possibly right.Mum and Dad arrived yesterday,the longest journey the GT6 has done since Dad rebodied her with a T6 Fabrications fibreglass LeMans body.Today's 'wheels off' adventure was to change the rear driveshafts and hub assemblies for ones rebuilt by Mike Papworth.  
 One advantage of Dad's car is the total absense of rusty fastenings to hamper jobs,the old unit he has in his gloved hands is nearly as clean as the new one.
 The shafts come complete with hubs and brake backplate,so the brake shoes,cylinders,adjusters etc need to be removed from the old and replaced on the new.Not much left on the nearside.
 Looks better all back together with brakes bled and the reasons for changing them were proved correct upon examnation,both UJ's were showing signs of fatigue and one wheel bearing felt a bit rough!
 After putting the car back on the ground and driving back and forth to allow the suspension to settle,it was up on some small wooden ramps to allow me to tighten the radius arm bolts with the car's weight on them.
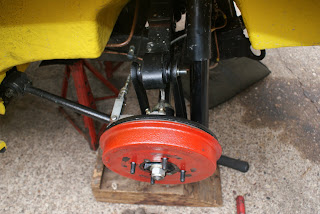
 Next job was on a more familiar car,but still involved wheels coming off.Time to fit the Stag rear drums on the PI.
Brakes dismantled and driveshafts withdrawn,no dramas with the six securing studs in the alloy trailling ams!
 A quick and gentle wire brush of the studs and trailing arm mounting face,then a light dusting with the copper grease spray and we are ready for reassembly.
 Cleaned the splines of the driveshafts and coated with CV grease to try and avoid spline lock after replacing the refurbed Stag backplate assemblies.
 Dad attacked the drum facings with a sotchbrite pad and some gunwash and they were back on.Also fitted a new rear cable on the handbrake and reset the brakes after bleeding the new cylinders.They do look nice though.

Sunday, 10 April 2011

Rhinoplasty?

With the estate getting a rebuilt diff,I decided that the quill shaft bearing in the diff 'nose' should be replaced too.After all what would be the point of putting the new diff in without doing it?The spare diff came with the correct height nose extension for the estate but these are said to be a weak spot particularly on facelift estates like ours,it's recommended to add some strength with welded 'webs' like shown below.
 Excuse the holes drilled in them,this wasn't some futile weight saving exercise,just holes from previous use of the steel bar they were cut from.I have owned an arc welder for over 20 years,it keeps dust off a shelf in the garage very nicely.I have never used it though.So I decided to have a go at welding them into place.I had mislaid the instructions,but had some 2.5mm welding rods and set the amps halfway through the range shown for this size and tried welding some scrap bar together.Not easy but I managed it,so I decided to have a go on the nose.A few hours later and lots of grinding back and rewelding,I had four welds that try as I might,I could not break.
 Not the prettiest job in the world and certainly no challenge to Chris Witor for his exchange strengthened nose pieces,but I did it myself and once painted and under the the car it will be fine.Today in between decorating our downstairs toilet I found time to assemble all the parts of the Stag rear brakes which are going on the pi.This is the final piece of the brake upgrade which has already seen me install the front brakes,master cylinder and servo and dual circuits from the same car.With any lluck these will be fitted later this week in time for Crich next weekend.

Saturday, 2 April 2011

Leaking diffs

The differential front oil seals on both our cars are leaking,the estate has always been dry up until a week or so ago,but the pi one has leaked from day one.The diff on the estate I have always suspected of being noisy,with a definate 'whooshing' sound at speed.With this in mind I went to see Mike Papworth this morning,with a spare 'unknown' estate diff and some Timken bearings that I have picked up from somewhere.Mike and his assistant Darren both said the same thing when the back cover came off..............so it looks like a full rebuild.At least the bearings and oil seal I took with me will make the cost a bit less and as Mike said,you can't just buy Timken bearings off the shelf.I should have it back the weekend of Crich Triumph day via Mr.Chatterton or Mike if he decides to go.
I didn't come home fromMike's empty handed though,my Dad had asked me to speak to Mike about some reconditioned halfshaft and hub assemblies for his T6 bodied mk1 GT6.We shall fit these when Mum and Dad come up to stay just before Crich.
Below are pics of these.Not a bad day for Mr Papworth then!